
Here now, we dedicated over a dozen posts on SSD and how you can make the most of it. If you are one of those early adopters that started putting your operating system’s main partition on an SSD chance are your SSD won’t be very large. Here you will get to know how to migrate Windows to SSD Drive. Over the years, the price of SSD has dropped dramatically, and if you consider upgrading your SSD, now it’s the time. You can get more than double the storage for the same price you paid 2 years ago. Also, keep in mind that SSD drive does die and it wears out, once it does it’s almost impossible to recover any data off SSD, unlike HDD.
Here is how to move your bootable Windows partition to a larger SSD drive, before we begin you need the following tools ready:
- Live CD / Bootable USD for Clonezilla, Open Source freeware
- Aomei Partition Assistant, free to download and use
The first option is to use Clonezilla Migrating Partitions
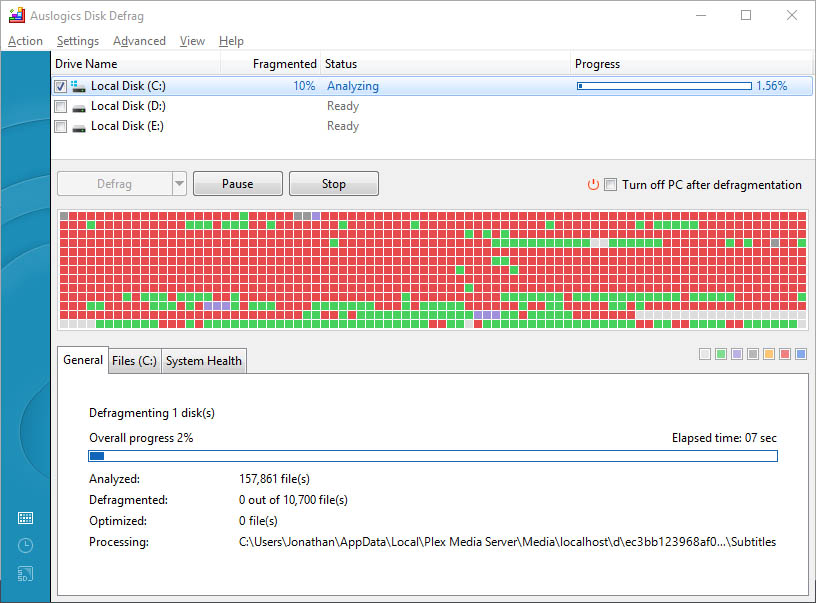
Before you start the migration, it’s important to make sure your disk is not in large fragmentation. You can use tools such as Auslogics Disk Defrag or Windows built-in tool to defrag your disk.
Once you have a clean defragmented disk you can start the migration process by cloning the entire partition to the new SSD with Clonezilla. The part that’s new is how to extend the partition to its full capacity. To gain the remaining partition space and merge it with C:\ drive.
To do this we turn to a free tool you can download and use called Aomei Partition Assistant. Note, you do NOT need to pay and use EASEUS Partition Manager, AOMEI offers exact same feature but without a price tag.

Once you have installed the tool, launch it and find Merge Partitions.

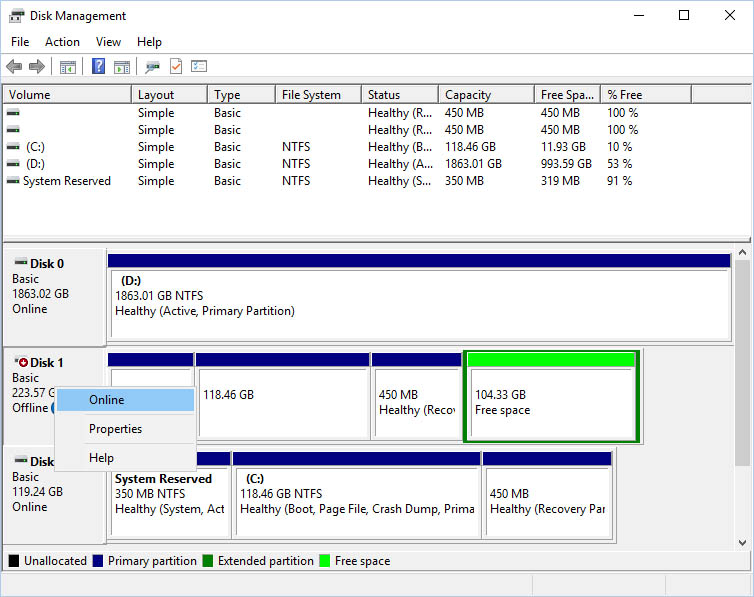
It will launch a wizard to allow you to select the partition and free unallocated space to merge. If the partition you selected is Offline, you need to go to Settings > Disk Management and select the disk to turn it Online again.

Select the partitions to merge and following the wizard steps, it will help you to guide finish the steps.


If your disk is defragmented, it should be very quick to merge the partition into one. Hence the importance of having a clean disk before you start any of the above steps.
Method Two: Use Aomei Partition Assistant Built-in SSD Migration Feature
You don’t have to use Clonezilla to make a bootable partition clone. An easier method is actually to use the Aomei Partition Assistant directly. It has a Migrate OS to SSD wizard built-in just for this purpose. You don’t even need to create any bootable image or anything. Aomei comes with an environment where you will complete the migration without loading Windows. That said, all the setup and settings have to be done first inside the Windows.

Start by launching Migrate OS to SSD wizard. First, make sure both disks are connected to the device, if you haven’t, please turn off your computer and do that now.

Next, select the destination partition/disk you’d like to migrate to, aka the SSD.

Here you have the option to select if you want to keep the original partition size or fully extend the bootable C partition. In the example below, originally I have 50GB of storage, with the new SSD it gets to expand to 120GB.

Following the wizard to complete the configuration.

Read all the notes carefully and proceed with caution.
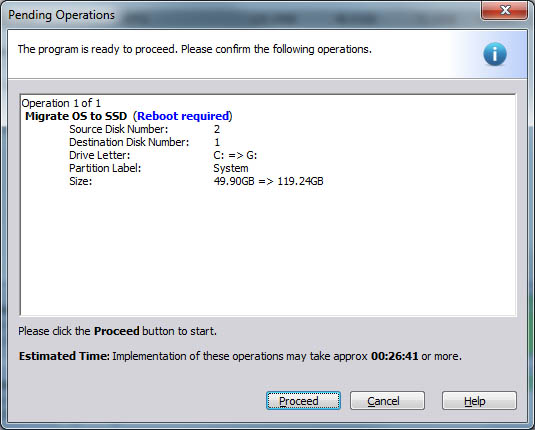
Now once the wizard is done, it doesn’t mean it’s over. You need to click “Apply” to start the process.

AOMEI partition assistant will now restart your machine and boot into a state where Windows is not loaded, there it can copy all the system files without disrupting.

Once you restart your PC, AOMEI will boot into its program to finish the copy process.

Once the process is completed, you are finished! The clean up you can do after is to change the boot order to make sure to load Windows under the right disk. Once you are back into Windows, you can clean up the previous C drive, and remove the partition. The new unallocated partition can be extended with Window’s built-in Disk Management tool. There you have it, two ways of migrating your OS into a larger disk, a larger SSD. Hope you find this useful when you upgrade your desktop to a new SSD.