
Windows Subsystem for Linux (WSL) has seen a number of community-supported projects, but systemd was one of the most sought-after requirements by developers. There have already been projects such as one-script-wsl2-systemd and genie to implement systemd on WSL2 in Windows 11 and 10. Noticing the passion for systemd implementations for WSL2, Microsoft has partnered with Canonical (publisher of Ubuntu) to bring official systemd support for Windows Subsystem for Linux. And now, developers can enable systemd for WSL2 in Windows 11 in 5 easy steps. So if you are interested, let’s go ahead and learn how to turn on systemd for WSL2 in Windows 11.
Enable Systemd for WSL2 in Windows 11 (2022)
In this tutorial, we have mentioned the instructions to enable systemd for Windows Subsystem for Linux in Windows 11 along with a quick explainer on the subject.
What is Systemd in Linux?
Systemd is a system and service manager for Linux-based operating systems. It’s essentially responsible for launching system components and services during the booting of a Linux system. You can say that it’s the parent process and initializes all other processes, hence, its PID (Process Identifier) is 1. So what is the big deal now that Windows Subsystem for Linux supports systemd?
First, systemd brings an almost near-native software environment to WSL. Basically, what you get from Ubuntu on a bare-metal installation, you get the same environment in WSL as well. Apart from that, there are many services like Snap, microk8s, Kubernetes, etc., that rely on systemd to work properly. So with official support from Microsoft, developers can now fully utilize WSL2 ‘s true potential and work on Windows and Linux simultaneously without missing out on anything.
Install the Latest Version of WSL2
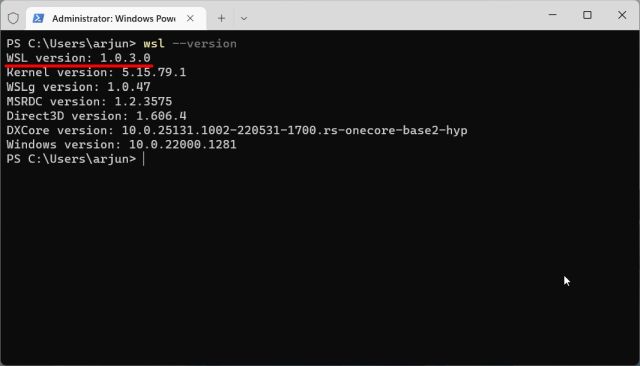
1. First, you need to download a particular version of WSL (Version 0.67.6 and above). Open PowerShell and run the below command to check the current version. If you have an updated version, move straight to the next section.
wsl --version
2. If you are on an older version, go ahead and download the latest WSL package from Microsoft’s GitHub page linked here. You don’t need to be on an Insider channel to enable systemd for WSL2 in Windows 11.

3. Next, install the Windows Subsystem for Linux MSIXBUNDLE package on your Windows 11 PC.

4. After that, open Windows Terminal with Administrator privileges. If you already have a Linux distro installed, move straight to the next section.

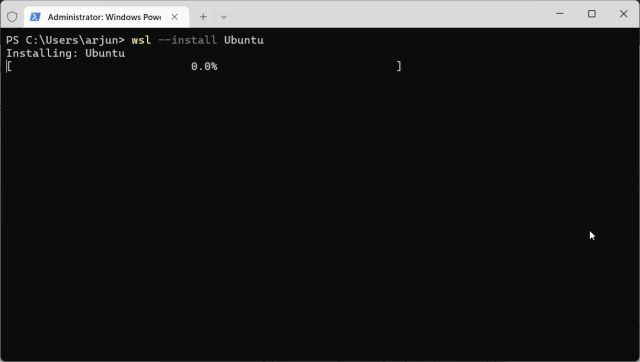
5. Next, move to PowerShell and run the below command. This will install the latest Ubuntu distribution. If you want to install any other Linux distro, you can install it from the Microsoft Store or run wsl --install to find all the available distributions.
wsl --install Ubuntu
Enable Systemd for WSL2 in Windows 11
1. Once Ubuntu (or your choice of Linux distro) is installed, open PowerShell again with Administrator privilege. Then, move to “Ubuntu” from the arrow button in the title bar.

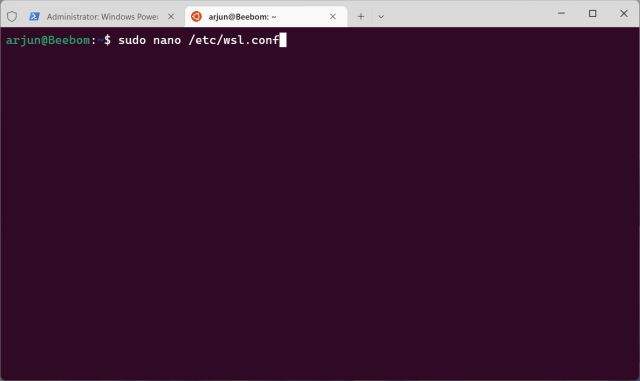
2. After setting your username and password, run the below command to edit the “wsl.conf” file using the Nano editor.
sudo nano /etc/wsl.conf
3. Here, add the below lines to the file. This will let you enable systemd for WSL2 on your Windows 11 computer.
[boot]
systemd=true

4. To save and exit from the Nano editor, press “Ctrl + O” and hit Enter. After that, press “Ctrl + X”. You have now made the necessary changes.

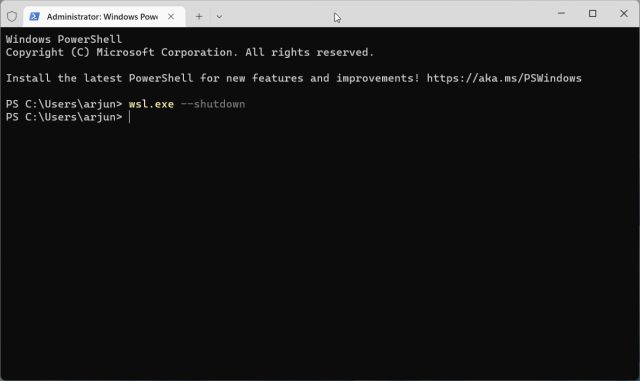
5. Now, you need to shut down Windows Subsystem for Linux. For that, close the Ubuntu tab and move to the PowerShell tab. Here, run the below command.
wsl.exe --shutdown
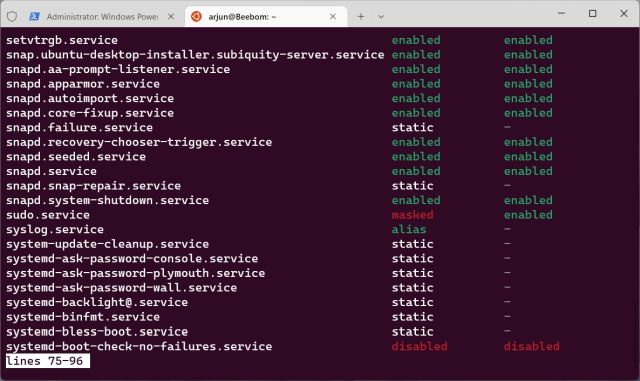
6. Now, go ahead and launch Ubuntu again from the Windows Terminal. Systemd will now be running in the background by default. To check, run the below command and see the service status.
systemctl list-unit-files --type=service
7. You can now install Nextcloud on WSL2 using Snap, which relies on systemd to function properly. Here, choose your own username and password in the second command. As shown in the screenshot below, all the Snap services are running properly.
sudo snap install nextcloud
sudo nextcloud.manual-install USERNAME PASSWORD
snap services

Turn on Systemd on Windows Subsystem for Linux
So these are the steps you need to follow to enable systemd for WSL in Windows 11. The best part is you don’t need to move to an Insider channel to enable systemd in your Linux subsystem on Windows. You can directly download the package from GitHub and install it right now. Moreover, if you want to install Android apps on Windows 11, head to our detailed tutorial. And to install Google Play Store on your Windows 11 PC, we have an updated guide for you. Finally, if you have any questions, let us know in the comment section below.